


Showlist - HikaDemo
banner1.png
banner2.png
banner3.png
A product page can have several layouts with different areas of information. Your product page can be very detailed with a lot of options and information or very light depending on your needs.
Product with main information :
 - Thumbnails and big picture (pop up)
- Name / price
- Quantity
- Characteristics / Options
- Add to cart button
- Description
Product with different layouts :


Product with additional information :
 - add to wishlist button
- vote and comments
- related products
- badges
- discounts
- specifications : custom fields
Provide the main information for your product

|
Modify the layout of your product

|
Add new properties to your product In the "PRODUCT" section of HikaShop you can add BADGES.., create BRANDS.. and give CHARACTERISTICS.. to your product. In the "PRODUCT" section of HikaShop you can add BADGES.., create BRANDS.. and give CHARACTERISTICS.. to your product.
If you want to add custom fields to your products, go in the section Display/Custom fields.., create a new custom field and select the Table "Product". Once you've created the field, it will appear on your back-end on the bottom of each product edition page (you can limit this field to one or several categories if needed). These specifications will appear on the front-end product details page. |
Create special products : related products / virtual products / donation products
You have an exemple on the bottom of this page.
This is the case of our e-books, if you put one of them in your cart and buy it, you will have access to the e-pub format : a version that you can download and directly use on your tablet !
|


You can do a lot of things with HikaShop and we can't show all the possibilities in this demo website, but here are some of the main features.
If you are searching for a specific feature, you can check our main features list here or send us an contact request..
User control panel
 Display the User Control Panel thanks to a menu item of the type "hikashop user control panel" which allow your users to manage their account :
- edit their profile and address
- view their orders
- see their carts and wishlists
- access their statistics for the affiliate program.
Affiliate program
![]() Thanks to the affiliate program feature, available in HikaShop Business edition, you can propose to your users to become your business partners and improve your sales! It's very simple, each time they bring you a customer they make money. For example, the Affiliate program will detect each click generated by your client's affiliate ID and store a cookie in the visitor's computer. If the visitor makes a purchase within X days of the first click, you'll get X % of the sales revenue!
Thanks to the affiliate program feature, available in HikaShop Business edition, you can propose to your users to become your business partners and improve your sales! It's very simple, each time they bring you a customer they make money. For example, the Affiliate program will detect each click generated by your client's affiliate ID and store a cookie in the visitor's computer. If the visitor makes a purchase within X days of the first click, you'll get X % of the sales revenue!
Entries
![]() This feature allows your users to register to something on your website with the HikaShop entry form using the entry custom fields. That is useful for example if you are building a website for an event, and you have several options available with different prices and you want your users to be able to enter several persons to the event in one order.
This feature allows your users to register to something on your website with the HikaShop entry form using the entry custom fields. That is useful for example if you are building a website for an event, and you have several options available with different prices and you want your users to be able to enter several persons to the event in one order.
That's the case we present here on our demo website.
Comparison of products
![]() You can display this comparison page thanks to a menu item of the type "HikaShop product comparison page". It allows you to present different products on a same table and compare their characteristics. Of course, you can display the buttons "add to cart" and also "add to wishlist" for each product.
You can display this comparison page thanks to a menu item of the type "HikaShop product comparison page". It allows you to present different products on a same table and compare their characteristics. Of course, you can display the buttons "add to cart" and also "add to wishlist" for each product.
Statistics and reports
![]() In order to follow the progression of your shop and improve your sales, a powerful reporting system is available in HikaShop. Thanks to several options that you will find in : hikashop / Orders / Reports, you will be able to track all your results and get statistics about all your store data.
In order to follow the progression of your shop and improve your sales, a powerful reporting system is available in HikaShop. Thanks to several options that you will find in : hikashop / Orders / Reports, you will be able to track all your results and get statistics about all your store data.
Coupons and discounts
 You want to boost your sales? Coupons and discounts are the perfect tools ! In HikaShop, they are really easy to create and configure. You will find all the options in : HikaShop / Orders / Discounts. On the front-end of this demo website, you can test our fake coupon entitled "SAMPLECOUPON" and get 50% on your order.

You can test all HikaShop options in the back-end, with the login : demo / demo.
Access now the HikaShop back-end
- Create : categories of products, products, customers...
- Configure : discounts, currencies, zones...
- Manage : orders, affiliates, customer's accounts...
- Add / Modify : styles, views, custom fields...
![]() Adding HikaSerial to HikaShop you will be able to add serials to your products in order to sell limited edition products, vouchers, software licenses or individual tickets.
Adding HikaSerial to HikaShop you will be able to add serials to your products in order to sell limited edition products, vouchers, software licenses or individual tickets.
You can check all HikaSerial features here.
Products with a serial number
 We created 3 gift cards in our shop (gold, silver and bronze). As we want them to be used only one time, we associated a serial number to them. It means that if you buy 3 cards, each of them will have its own unique number.
To understand how it works for the customer, you can add a card to your cart, then in the checkout process choose the payment method entitled "(test) Validate my order" and finish the checkout.
Now that you bought the card, you can get it on your control panel when you click on the link "view your orders". Here is the list of your previous orders, where you can download or print the card ("file" column).
You can personalized your card by writing a message on it. This feature works thanks to a custom item field associated to the product. This way, the final card will have its serial number and its message, but you can also customise its background in the back-end.

In the HikaSerial back-end, you can create, manage and customise your serials, thanks to options and plugins.
Access now to the HikaSerial back-end
 Hikashop Business gives you the opportunity to display a carousel with plenty of effects for categories and products listings modules. It also offers you three layouts for categories and products listings with sliding/fading effects. You will see here the different possibilities offered by these carousel and layouts, and learn how to configure them.
First, let's see what you could obtain if you configure your modules as explained on this page:
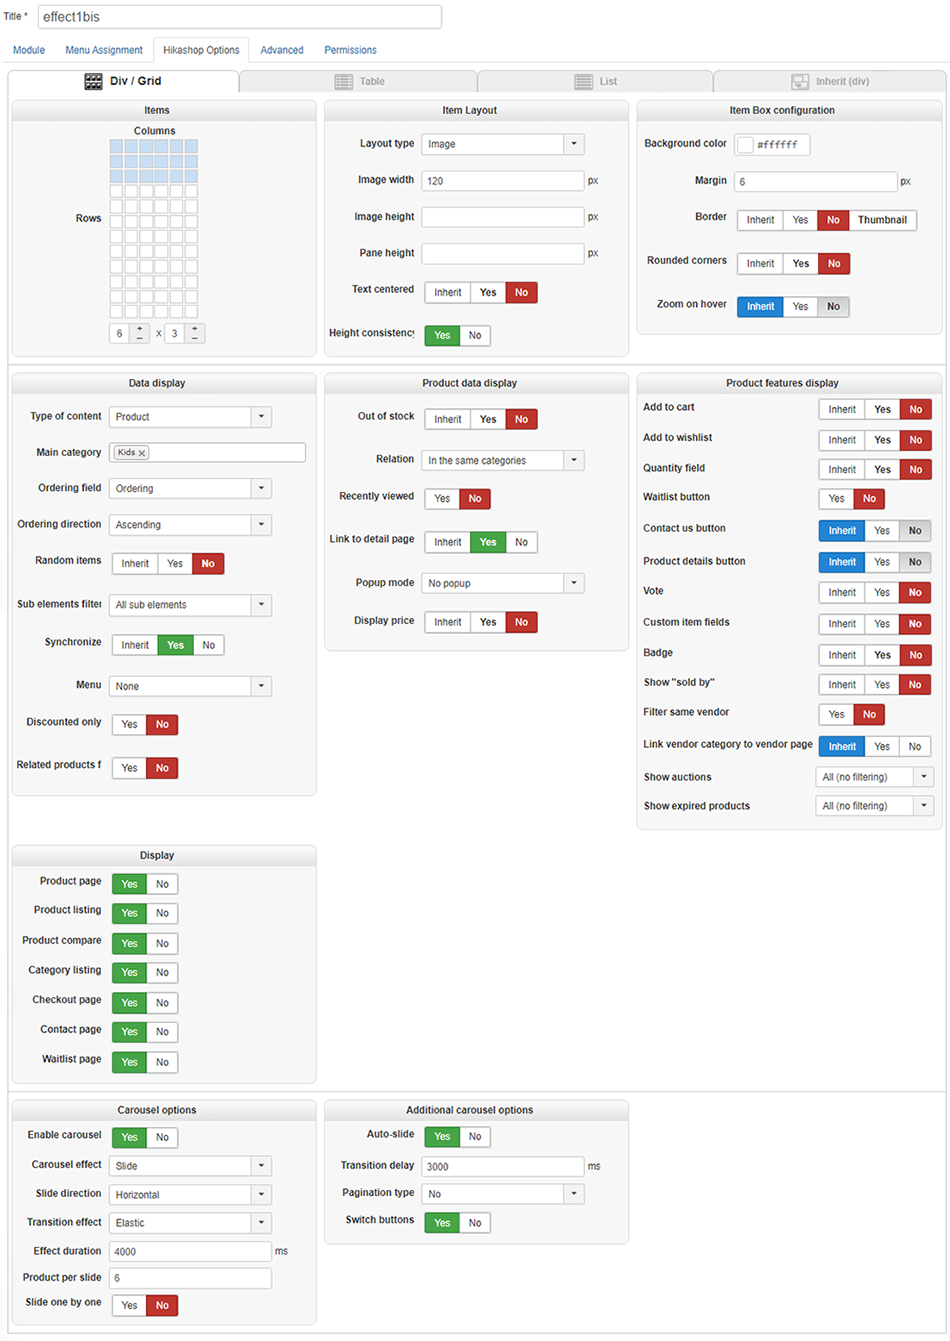
A six products slider in one column


A six products slider in two columns


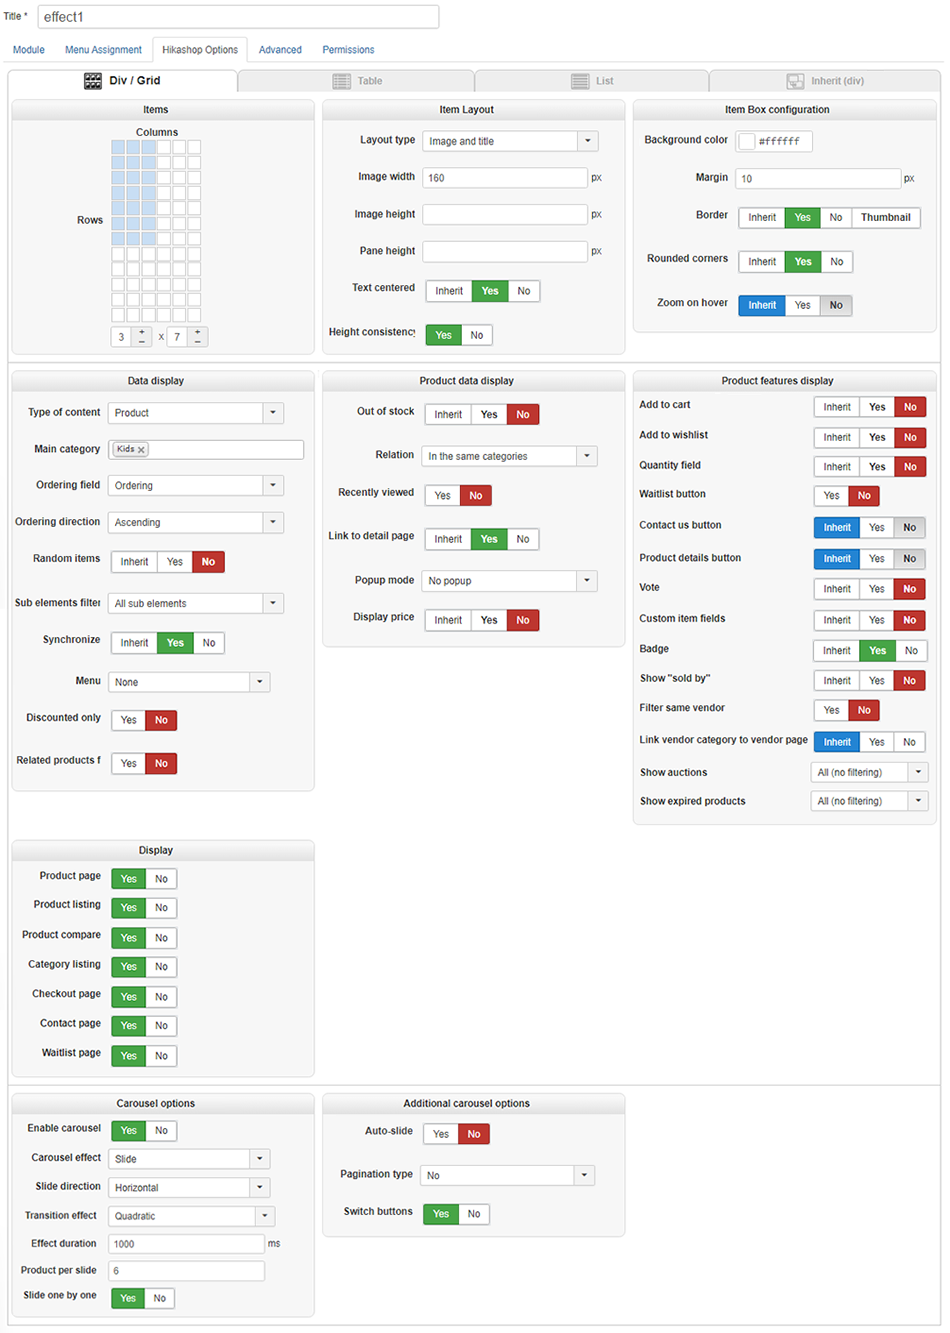
As you can see, in this case, the main carousel effect is a vertical slide. The selected category (on the left) defines the products to be displayed (here : shoes / kids). Then, we chose a quadratic transition among many possibilities in order to define the type of the transition and then we defined the effect duration. Thanks to this two parameters, you can easily define the speed of the carousel and the way the carousel is sliding (transitions are equations that define the evolution of the speed. For example, if you choose "Linear", the slide speed will be constant). Please note that the border around the products is made by the option "Item box border" (at the bottom).
Once the effect type is configured, you have to choose how much products you want to display, and how. As you can see, every slide shows 3 products. This parameter is defined in the field "Product per slide". But this field doesn't work by itself, you also have to choose the number of columns (on the left) to decide how products will be organized. If you choose 2 columns, you will have the same thing as presented. But if you enter "1", the products will be vertically aligned (as you can see with the module on the left of this page). With this two parameters, you have an great control over the products organization.
Here we choose to display products with badges so that we can see them (10% / 20% / new products), but you can choose to hide these badges thanks to the option : "display badges".
Three products in a fade


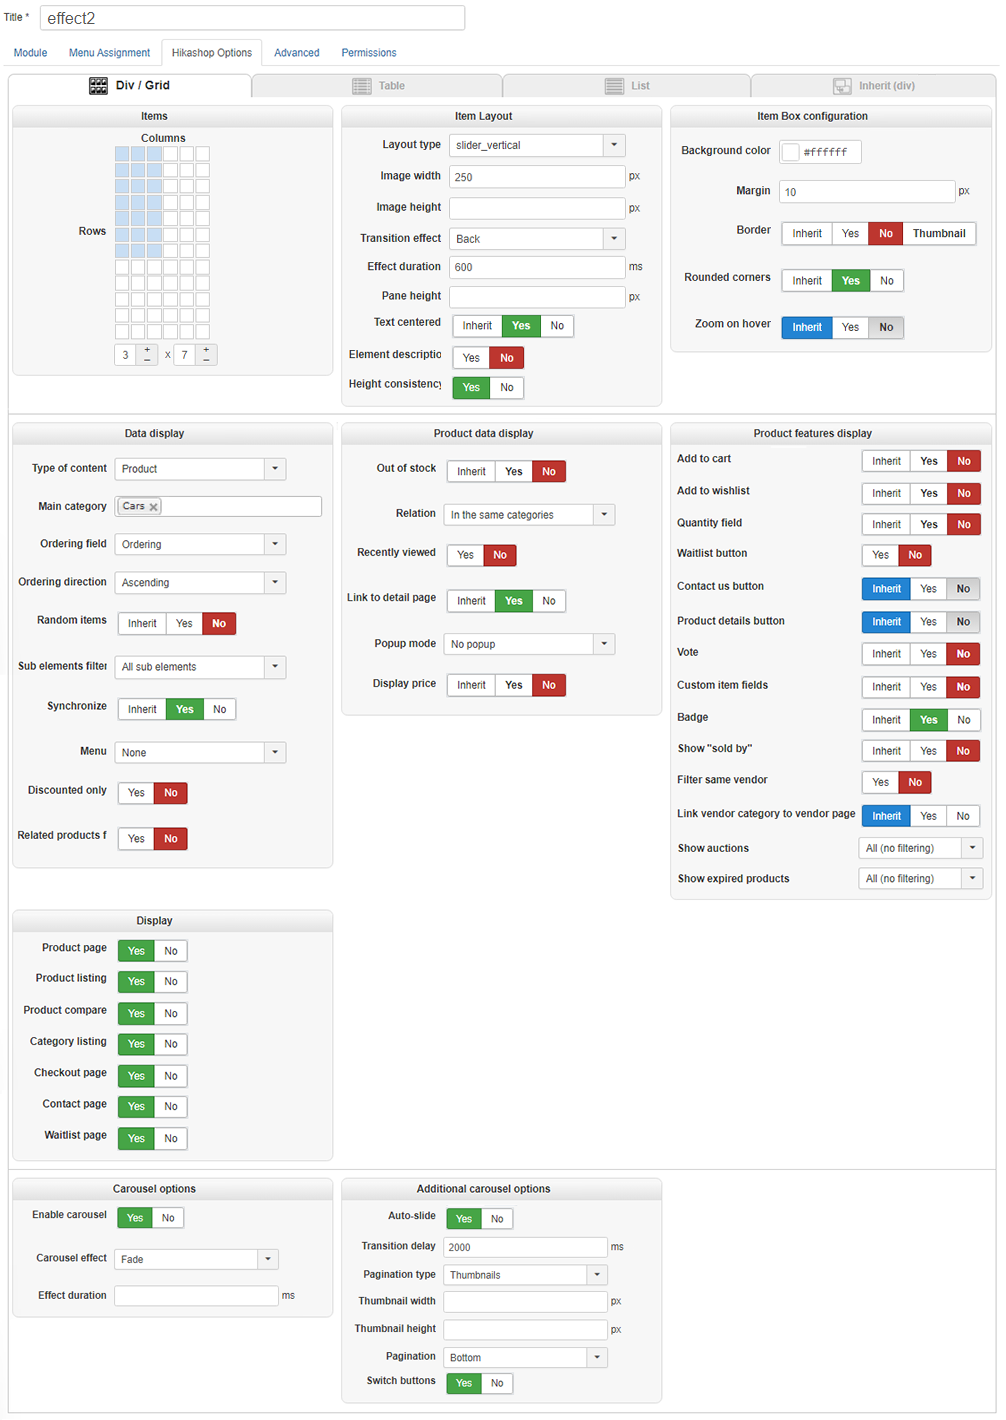
As with the first example, this carousel is moving automatically. To enable this functionality, just activate the "Auto-slide" parameter. You can also define the duration between two slides. The next option is really interesting. You can chose here how to display the carousel pagination. We selected here a thumbnail pagination, and put it on the right. As you can see, there is no dimension specified here, so the thumbnail size are 1/8 of the the product pictures. But you can specify a width and a height as in the first example. Note that when the auto-slide is enabled, the selected thumbnails are also changing.
This carousel also have a special effect applied on the product. This effect come from the selected layout. Three animated layouts are available in Hikashop Business, vertical and horizontal slide, and a fade effect. When you select one of these layouts, some new options will be displayed allowing you to configure more precisely the effect. In that case, we selected the horizontal slide so it makes a slide between the product image and the product description. Note that the description displayed is the text typed before the "readmore" tag in the product description.
Infinite slide


The trick to get this effet of infinite sliding is to set the same duration for the effect and for the auto-slide duration. When the slide effect is done, the auto-slide waiting time is reached and a new slide starts immediately. Note that you have to choose the "Linear" transition to get this result.
Regarding the other parameters of this carousel, you can see that the pagination used here is "dots" (which add these dots at the bottom of the carousel), and that the carousel buttons aren't enabled.
Then, we go to very useful Hikashop functionality. You can define here the dimension of the pictures which will be displayed on your carousel. As you can see in this screenshot, if one of the fields is empty, the other will be automatically calculated. Thanks to that, you don't have to choose a perfect dimension for all your pictures. The layout selected is here a simple image, that explains why the classical informations aren't displayed (price, name...).
One product exposition


Here, we decided to highlight products one at a time by having only one product displayed per slide. For that, we set the number of columns to 1 and the number of products per slide to 1. Next, we defined the size of the image to get a large picture of our product, and selected the "Pane" layout (which is a simple presentation of the product).
You can also see that the pagination is here "Name". With this pagination you will get the products name with the slide number before. Note that you can easily modify the CSS class of the product name to get something which match the design of your website. Here is the configuration page . :

Now, go for it and create your own carousel !
The only option we didn't talk about is the "Slide one by one" option. With this option you can have the slider (this option only works with the slide effect) to slide one product at a time (so column by column or line by line if your table is multi-dimensional) or to slide page by page (so sliding 4 by 4 products if you have 4 products on a slide). You should now have all the keys to create your own carousel and display your products with some neat effects.
The number of possibilities offered by the carousel is big, but don't forget that you can also put your carousel everywhere you want on your website because it's a module. That's what we did on this page by putting the modules directly inside this article and with the slider on the left of this page. This last carousel is even more special as it displays categories instead of products (you can choose the item type displayed on the left of the configuration screen). We'll now give you a last tip: If you want to display 4 products and not use the slide "one by one", but you don't have exactly 8, 10 or 12 products, you can limit the number of items in your carousel by using the field "Number of items" and get a perfect result.
![]()
Adding HIKAMARKET to HikaShop, you will be able to create a multi-vendor website (a marketplace) and manage your shop from the front-end.
HikaMarket is declined in 2 different versions, depending on your needs.
 HikaMarket Front-edition to manage all your store from the front-end of your website. Manage products, sales, customers, stocks and discounts... quickly and easily!
HikaMarket multi-vendor to create a real marketplace with several vendors. Manage sales, fees, taxes, different payment and shipment methods for each one of them.
You can compare these versions thanks to our features list.
Vendor control panel
 Thanks to a menu item of the type " hikamarket / vendor control panel", you can display the vendor account on your website. Each vendor of your marketplace can find here the main information for his own shop on your website : his vendor account, his customers and orders, his categories and products, his discounts but also the main statistics to assess the status of his sales.
Vendors listing
 Exactly as a products listing, you can display a list of all the vendors of your website, show their picture and name with different kind of layouts.
You will obtain this page thanks to the menu item type "hikamarket / vendors listing".
Vendor page
 Thanks to the menu item type "hikamarket / vendor page" you can display a page dedicated to a vendor, with his name, a picture, a description and some custom fields about his company. You can choose to display the "vote and comment" module on this vendor page so that all the users can note the vendors.
Vendor edition
 Thanks to the menu item type "hikamarket / vendor edition", you can display a configuration page, where the vendor can edit his profile, fill a form to give details about him (name, email, avatar...) and about his company (brand, address, VAT number, description...). He can also add "Terms and Conditions" and manage his users.

Through the back-end of this demo website you can access and test all the configuration options of HIkaMarket. Create vendors, associate products to them, manage access levels, try different display options, add custom fields, and take a look at our plugins.
Access now to the HikaMarket back-end